Frequency Optimization through Pipelining
By- Sandeep Saini
Introduction
Improving data flow through stages, minimizing delays, and optimizing timing are crucial strategies in IC design. Incorporating stages and applying retiming techniques boosts overall efficiency and speed in digital systems. In Verilog code, optimizing for maximum frequency is essential for meeting today’s tech demands. IDS tools address these parameters by incorporating stage properties, reducing propagation delay, and enhancing maximum frequency.
Calculation of maximum frequency :
Calculating the maximum frequency in Verilog code involves assessing the critical path delay within the design. The critical path is the longest path that determines the maximum time it takes for a signal to propagate through the circuit. The formula for calculating frequency (f) is:
f=1/T
where T is the clock period, and f is the clock frequency.
T = Critical Path Delay + Setup Time
The critical path delay in a digital circuit represents the longest path that a signal can take from the input of a circuit to its output. It determines the maximum time it takes for a signal to propagate through the circuit.
It’s important to optimize the Verilog code, minimize logic delays, and consider techniques like pipelining and retiming to enhance the critical path and achieve a higher maximum frequency.
Retiming:
Retime is a technique used in digital circuit design to optimize the placement of registers (flip-flops) in a sequential circuit without changing its functionality. The primary goal of retiming is to improve critical path timing and potentially increase the clock frequency of the circuit.
Pipelining:
Pipelining is a technique that entails dividing the logical operations into smaller segments, with flip-flops inserted between these segments. By doing so, the delay associated with the logic path between consecutive flip-flops is minimized. This reduction in logic per clock cycle enables a higher clock frequency to be achieved.
Let’s consider a simple Verilog code example before and after applying pipelining. We’ll use a 2-bit shift register as the circuit.
Before Pipelining :
module shift_register(input clk, input reset, input [1:0] data_in, output reg [1:0] data_out);
always @(posedge clk or posedge reset) begin
if (reset)
data_out <= 2'b0;
else
data_out <= {data_in[0], data_in[1]};
end
endmodule
In this initial code, we have a 2-bit shift register that shifts the data on each rising edge of the clock (clk). The critical path involves the combinational logic that performs the shift operation.
After Pipelining :
module shift_register(input clk, input reset, input [1:0] data_in, output reg [1:0] data_out);
reg [1:0] next_data_out;
always @(posedge clk or posedge reset) begin
if (reset)
data_out <= 2'b0;
else begin
next_data_out <= {data_in[0], data_in[1]};
data_out <= next_data_out;
end
end
endmodule
In the optimized code after applying pipeline , we’ve introduced an intermediate register next_data_out. By doing this, we’ve moved the register closer to the combinational logic, potentially improving the critical path timing.
In the context of Verilog or digital circuit design, let’s break down what this means:
- Original Sequential Logic:
In the optimized version, you introduce an additional register in between the original register and the preceding combinational logic.This intermediate register divides the original combinational logic path into two segments.
- Purpose of Intermediate Register:
The purpose of this intermediate register is to break the long combinational path, allowing for better balancing of the critical path and potentially improving overall circuit timing.
- Timing Considerations:
The placement of this intermediate register should be chosen strategically to avoid introducing new timing issues or violating setup and hold time constraints.
The use of the intermediate register introduces a pipeline stage, and it can contribute to better timing performance if done correctly.
A typical design flow is visually depicted in the diagram below:
 —–Before Pipeline——

—–After Applying Pipeline——
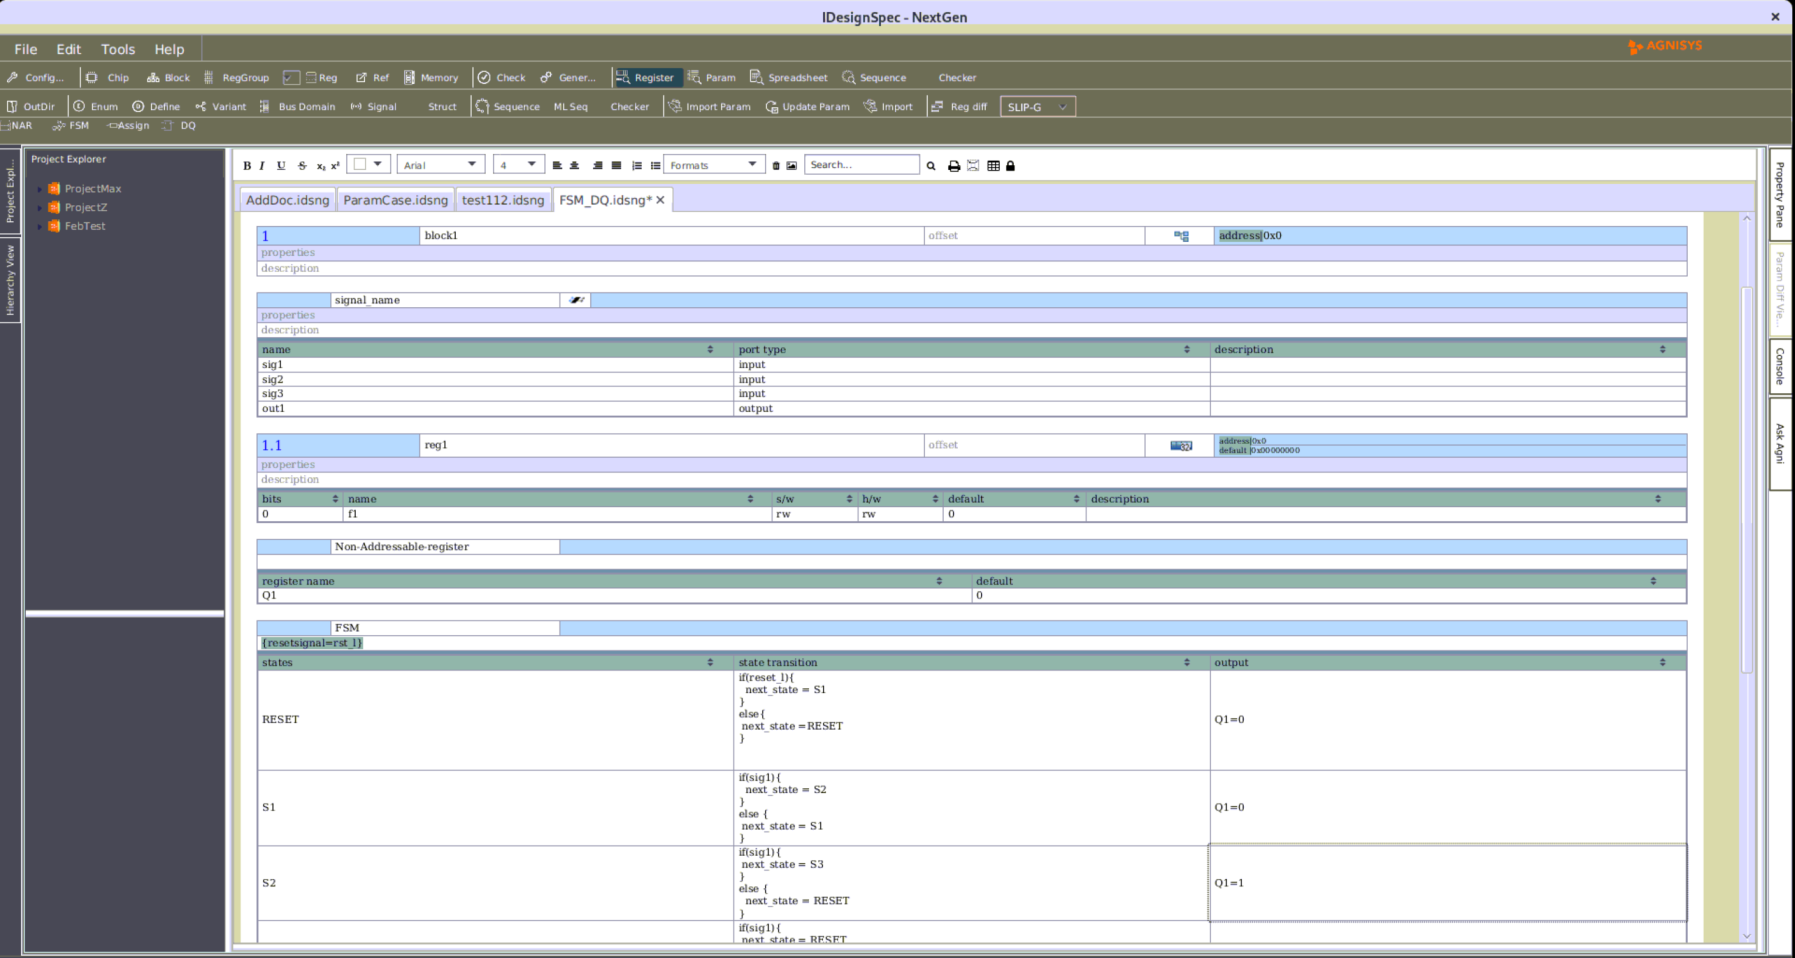
IDS support :
The IDS facilitates critical path optimization through the retiming & pipelining technique, utilizing properties like “rb_valid_stages”,”rb_data_stages”,”addr_decode_stages”, “rb_stb_stages”, and “wr_stb_stages”. These properties play a role in incorporating additional intermediate registers to enhance the overall efficiency of the critical path. Synthesis tool will optimize the placement of registers (flip-flops) in a sequential circuit without changing its functionality.
Example
Let’s take a look at an example to understand this. Consider the following input
property rb_valid_stages {type = number ; component = addrmap;};
property rb_data_stages {type = number ; component = addrmap;};
addrmap Block1 {
rb_valid_stages = 2;
rb_data_stages = 2;
reg Reg1 {
field {
hw = rw;
sw = rw;
}Fld[31:0] = 32'h0 ;
};
Reg1 Reg1;
};
Verilog output :
Generated Verilog Code for rb_data_stages
assign rd_data0 = Reg1_rd_data;
assign error = 0;
always @ (posedge clk)
begin
if (!reset_l)
begin
rd_data1 <= 32'd0;
rd_data <= 32'd0;
end
else
begin
rd_data1 <= rd_data0;
rd_data <= rd_data1;
end
end //always clk
Generated Code for rb_valid_stages
always @ (posedge clk)
begin
if (!reset_l)
begin
rd_data_vld1 <= 1'b0;
rd_data_vld <= 1'b0;
end
else
begin
rd_data_vld1 <= rd_data_vld0;
rd_data_vld <= rd_data_vld1;
end
end //always clk
assign request = 1'b1;
assign rd_data_vld0 = rd_stb & ~(error) & ~( rd_data_vld | rd_data_vld1);
assign rd_wait = 1'b1;
Importance of Frequency Optimization:
Frequency optimization is crucial for boosting digital circuit performance:
- Enhanced Throughput:
Faster clock cycles result in increased data processing efficiency.
- Reduced Critical Paths:
Minimizing critical paths allows for higher clock speeds and better performance.
- Lower Latency:
Pipelining reduces operation latency, improving system responsiveness.
- Scalability:
Optimized designs are more adaptable to higher clock speeds in newer hardware.
In summary, frequency optimization is essential for achieving faster, more efficient, and power-conscious digital designs.
Conclusion:
Frequency optimization involves tuning up a digital device to enhance its speed. In the realm of digital design languages like Verilog, this step is crucial for improving the performance of digital gadgets, such as those found in computers or devices with programmable chips like FPGAs. It’s akin to providing a slight speed boost to your technology, resulting in better overall performance. Utilizing properties, as mentioned by IDS in the world of automation, allows users to achieve this enhancement.
Power optimization in IDS
By- Yogita Koli
Introduction
As smartphones and IoT devices are increasing rapidly, optimizing power usage is crucial in the design process. Today’s integrated circuits, packed with over 100 million transistors and operating at speeds beyond 1 GHz, consume significant power.
IDS addresses this challenge with power optimization, employing clock gating techniques as a key solution.
Power optimization involves techniques to minimize the power consumption of digital circuits. It is aiming to minimize the energy consumption of a system without compromising its functionality.
Clock gating is a method to turn-off the clock when it is not needed to save power. It is used in SOC design today as an effective technique to save power. In IDS, clock gating is done through the property “clock_enable” and the switch “Optimize for low power”.
Importance of Optimization
- Reduced Dynamic Power:
Clock gating reduces dynamic power consumption by preventing unnecessary switching activities when the flip-flop doesn’t need to change its state.
- Improved Energy Efficiency:
With clock gating, the flip-flop becomes more energy-efficient, making it suitable for battery-powered devices where energy conservation is crucial.
- Extended Battery Life:
In applications like mobile devices or IoT nodes, power optimization techniques contribute to longer battery life, enhancing the user experience.
How power optimization works in IDS
Consider a simple example of a digital circuit to illustrate the importance of “power optimization”. This basic scenario involves a flip-flop and how power optimization techniques can impact its energy consumption.
Without Power Optimization:
Consider a flip-flop that toggles its output based on an input signal, and it is part of a larger digital system. The flip-flop transitions whenever there’s a change in the input signal.
module NonOptimizedFlipFlop (
input wire clk,
input wire data,
output reg q
);
always @(posedge clk) begin
q <= data;
end
endmodule
In this non-optimized example, the flip-flop changes its output (q) on every rising edge of the clock (clk). This behavior can be power-consuming, especially if the input signal changes frequently.
With Power Optimization:
Now, let’s introduce a power optimization technique using clock gating.
module OptimizedFlipFlop (
input wire clk,
input wire data,
input wire enable, //Enable signal for clock gating
output reg q
);
always @(posedge clk or enable) begin
if (enable) begin
q <= data;
end
end
endmodule
- In this optimized example, the flip-flop updates its output only when the enable signal is asserted. This allows the circuit to skip unnecessary transitions when the input signal remains constant, leading to power savings.
- Along with “clock_gating” IDS also supports a top property called power_opt = <number>. The number will be binary encoded, with each bit representing some form of optimization for power. Additionally, IDS supports one more property called exclude_clock_gating=true, to exclude a register and section from clock_gating.
- power_opt=1: When the command line property -top_property “power_opt=1” is applied, this will generate a ‘qactive’ signal and assign the clock enable signal to the ‘qactive’ signal.
- power_opt=2: When the property -top_property “power_opt=2” is applied to a block, this will group all registers that have hardware access to read-write and write-only (hw = rw or hw = wo), and these registers will be excluded from clock gating. Additionally, it will group all registers that have software access to read-write and read-only (sw = rw or sw = ro), and these CSR will be executed from the gated clock.
- power_opt=”3”: If the command line property -top_property “power_opt=3” is enabled, it will result in the selection of both the 1 and 2 values.
Command line:
idsbatch <input testcase> -o verilog -bus <bus name> -top_property “power_opt=1/2/3”
Conclusion:
In conclusion, clock gating stands as a pivotal strategy in digital design, efficiently conserving energy, extending battery life, and aligning with sustainability goals while maintaining optimal functionality. It represents a commitment to achieving the delicate balance between performance and power efficiency in the dynamic landscape of modern VLSI circuit design.
Hierarchical decode in VHDL
By- Sahil Singh
Address decoding plays a critical role in organizing the memory or registers within a chip, ensuring efficient functionality and access. Without address decoding, connecting multiple IP blocks to a processor would be impractical in modern System-on-Chips (SoCs).
There are two primary methods of address decoding:
- Absolute Decode:
In absolute decoding, all address bits are directly used to select specific memory locations or registers within each block. This method is typically set as the default functionality in tools like IDesignSpec.
- Hierarchical Decode:
Hierarchical decoding divides the address bits into two parts: the most significant bits (MSB) used to select the block and the least significant bits (LSB) used to further specify the register within the selected block. This approach offers several advantages:
– It minimizes routing congestion by not requiring the entire address bus to be routed to every block.
– Decode operations occur centrally, reducing power consumption.
– Select lines signal the chosen blocks, simplifying the process and enabling efficient reuse of physical blocks.
As the semiconductor industry continues to push the boundaries of innovation, this transformative methodology stands as a testament to the relentless pursuit of optimization and efficiency, ushering in a new era of performance-driven VHDL design.
Example:
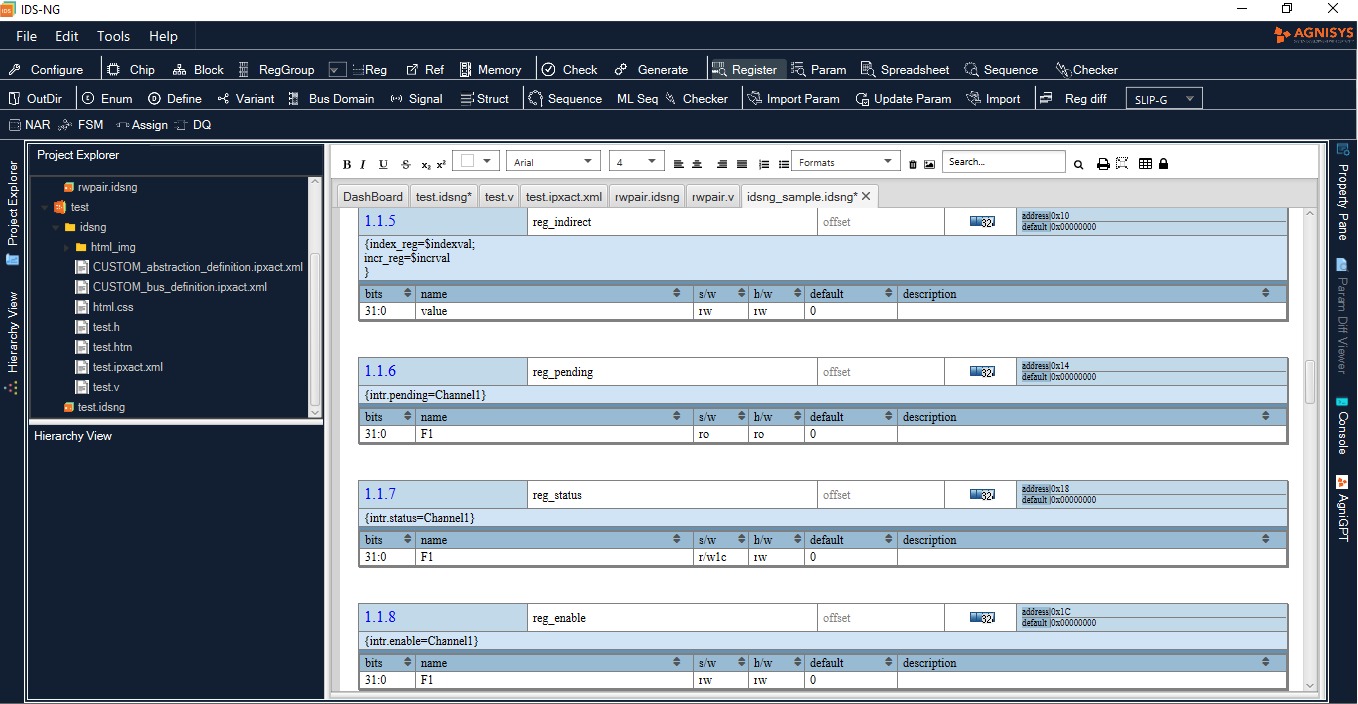
IDS-NG:

Without hierarchical decode:
As an example, if there is a repeat of 2 on the block then registers of iteration ‘0’ are at 0x0 and 0x4 and registers of iteration ‘1’ are at 0x08 and 0xC.

Figure A: Wave-diagram of absolute decoding in design.
With Hierarchical Decode
The block structure will be re-used and also the register’s address structure will remain the same. Considering the same example if there is a repeat of 2 on the block then registers of iteration ‘0 ‘ and ‘1’ are both at 0x0 and 0x4. Register mapping of the blocks with hierarchical decode is as shown below.
 Figure B: Wave-diagram of hierarchical decodinin design.
Output VHDL:
. . .
. . .
-------------------------------------------------
-- ARCHITECTURE : Chip1_e ARCHITECTURE
--------------------------------------------------
architecture rtl of Chip1_e is
--: BLOCK1 Signal Declarations
signal Block1_ids_pready : std_logic_vector (Chip1_Block1_count -1 downto 0);
signal Block1_ids_prdata : std_logic_vector ((G_APB_BUS_WIDTH * Chip1_Block1_count) -1 downto 0);
signal Block1_ids_pslverr : std_logic_vector (Chip1_Block1_count -1 downto 0);
signal Block1_ids_paddr : std_logic_vector (Block1_addr_width -1 downto 0);
-- Signal Declarations
signal invalid_address : std_logic;
signal Block1_ids_select : std_logic_vector (Chip1_Block1_count -1 downto 0);
type Block1_ids_offset_wire_type is array (natural range <>) of unsigned (G_APB_ADDR_WIDTH -1 downto 0) ;
signal Block1_ids_offset_wire : Block1_ids_offset_wire_type (Chip1_Block1_count -1 downto 0);
signal Block1_ids_prdata_wire : std_logic_vector (G_APB_BUS_WIDTH -1 downto 0);
-- AND Reduce function
function and_reduce(input_vector: std_logic_vector) return std_logic is
variable result : std_logic := '1';
begin
for i in input_vector'range loop
result := result and input_vector(i);
end loop;
return result;
end function;
-- OR Reduce function
function or_reduce(input_vector: std_logic_vector) return std_logic is
variable result : std_logic := '0';
begin
for i in input_vector'range loop
result := result or input_vector(i);
end loop;
return result;
end function;
begin
generate_Block1_inst : for Block1_i in (Chip1_Block1_count - 1) downto 0 generate
Block1_ids_offset_wire(Block1_i) <= resize(G_chip_Block1_offset(Block1_addr_width -1 downto 0), G_APB_ADDR_WIDTH) + to_unsigned(Block1_i * 8, G_APB_ADDR_WIDTH);
Block1_ids_select(Block1_i) <= '1' when ( (to_integer(unsigned( paddr(G_APB_ADDR_WIDTH -1 downto Block1_addr_width) )) = Block1_ids_offset_wire(Block1_i)(G_APB_ADDR_WIDTH -1 downto Block1_addr_width)) and (psel = '1') and (invalid_address /= '1') ) else '0';
Block1 : entity work.Block1_e
generic map (
G_APB_ADDR_WIDTH => G_APB_ADDR_WIDTH
)
port map (
-- BUS : APB
pclk => pclk,
presetn => presetn,
psel => Block1_ids_select(Block1_i),
penable => penable,
pwrite => pwrite,
pprot => pprot,
pstrb => pstrb,
pwdata => pwdata,
paddr => paddr,
pready => Block1_ids_pready(Block1_i),
prdata => Block1_ids_prdata(G_APB_BUS_WIDTH * (Block1_i + 1) -1 downto (G_APB_BUS_WIDTH * Block1_i)),
pslverr => Block1_ids_pslverr(Block1_i),
--------------------------------------------------
reg_in => reg_in.Block1(Block1_i),
reg_out => reg_out.Block1(Block1_i),
reg_out_enb => reg_out_enb.Block1(Block1_i),
reg_in_enb => reg_in_enb.Block1(Block1_i),
ext_in => ext_in.Block1(Block1_i),
ext_out => ext_out.Block1(Block1_i)
);
end generate generate_Block1_inst;
-- Signal Assignment Statements
invalid_address <= '0';
Block1_ids_paddr <= paddr(Block1_addr_width -1 downto 0);
-- parameterized OR reduction logic for signal PRDATA in BLOCK1
prdata_Block1 : entity work.param_reduction_or
generic map (
width => G_APB_BUS_WIDTH,
count => Chip1_Block1_count
)
port map (
data_in => Block1_ids_prdata,
data_out => Block1_ids_prdata_wire
);
prdata <= Block1_ids_prdata_wire;
pready <= '1' when (and_reduce(Block1_ids_pready) = '1') else '0';
pslverr <= invalid_address or or_reduce(Block1_ids_pslverr);
end rtl;
-- end_arch
Conclusion:
In conclusion, hierarchical decoding represents a significant advancement in computer chip design, offering a smarter approach to organizing memory and registers. By splitting the address into two parts – the most significant bits and the least significant bits – this method streamlines access, reduces energy consumption, and simplifies chip reuse. Its implementation enhances efficiency, reduces complexity, and paves the way for more powerful and versatile electronic devices. As technology continues to evolve, hierarchical decoding stands as a fundamental strategy driving the optimization and innovation of modern semiconductor architectures.
Parametric RTL Support
By- Mohit Saxena
Introduction
In the RTL design, efficiency and flexibility are key factors. That’s why IDesignSpec upgrades to RTL generation that take parameterization to the next level.
With these enhancements, users can customize RTL designs effortlessly using parameters. This means you can tailor your RTL designs to fit your exact needs, whether it’s adjusting the number of registers in an array, changing field width, or adding or removing registers and fields.
With IDesignSpec, you have more control over your designs than ever before. Whether it’s deciding on the presence of a register file, adjusting the number of regfiles in an array, or including specific index regfiles, you can fine-tune your designs precisely for performance and efficiency.
We have introduced a top_property “define_as_param” which takes true value to enable parametric RTL generation.
In conclusion, IDesignSpec’s parametric RTL generation brings a new level of flexibility and efficiency to design. By harnessing the power of parameterization, you can tackle complex design challenges with ease while ensuring compatibility and coherence within the IDesignSpec.
Use Cases:
SystemRDL Example:
addrmap block{
regfile file_outside# (longint unsigned NUM = 4, longint unsigned WID = 3 ) {
regfile file_inside{
reg {
field {}f1;
}regA[NUM];
reg {
field {}f1;
}regB[WID];
reg {
field {}f1;
field {}f2;
}regC[WID];
regA->ispresent=WID;
regC.f2->ispresent=NUM
};file_inside file_inside;
};file_outside file_outside;
};
Command Line: idsbatch -out “verilogl” -bus apb -top_property “define_as_param=true;rtl_pack_array=true;” test.rdl -dir ids
Output:
module block_ids#(
// PARAMETERS
parameter NUM = 4,
parameter WID = 3,
localparam bus_width = 32,
localparam addr_width = 6,
localparam block_size = 'h28,
. . . . . .
. . . . . .
wire [bus_width - 1 : 0] [NUM-1 : 0]fileinside_regA_rd_data;
wire fileinside_regA_decode[NUM-1 : 0]; // Write Decode
. . . .
. . . .
wire [bus_width-1 : 0] fileinside_regC_rd_data[WID-1 : 0]; // Read Data
reg [WID-1 : 0] fileinside_regC_f1_q; // FIELD : f1
reg [WID-1 : 0] fileinside_regC_f2_q;
wire fileinside_regC_f2_q_wire[WID-1 : 0];
. . . . . .
. . . . . .
generate
if (WID)
begin : fileinside_regA
genvar fileinside_regA_i;
for( fileinside_regA_i = 0; fileinside_regA_i < NUM; fileinside_regA_i = fileinside_regA_i + 1)
begin : fileinside_regA_gen
. . . . . . .
. . . . . . .
genvar fileinside_regB_i;
for( fileinside_regB_i = 0; fileinside_regB_i < WID; fileinside_regB_i = fileinside_regB_i + 1)
begin : fileinside_regB_gen
. . . . . . .
. . . . .
assign fileinside_regB_f1_r[fileinside_regB_i] = fileinside_regB_f1_q[fileinside_regB_i]; // Field : F1
assign fileinside_regB_rd_data [fileinside_regB_i] = fileinside_regB_rd_valid[fileinside_regB_i] ? {31'h0, fileinside_regB_f1_q[fileinside_regB_i]} : 32'd0;
end //fileinside_regB
endgenerate
. . . . .
. . . . .
. . . . .
generate
genvar fileinside_regC_i;
for( fileinside_regC_i = 0; fileinside_regC_i < WID; fileinside_regC_i = fileinside_regC_i + 1)
begin : fileinside_regC_gen
. . . . .
. . . . .
. . . . .
//----------------------------------------------------------------------------
// FIELD : F2
// HW ACCESS : RW WIDTH : 1
// SW ACCESS : RW OFFSET : 1
//-----------------------------------------------------------------
/*DESCRIPTION : NA
*/
always @(posedge clk) begin
if (!reset_l)
begin
fileinside_regC_f2_q[fileinside_regC_i] <= 1'bx;
end
. . . .
. . . .
. . . .
. . . .
end //fileinside_regC
endgenerate
SystemRDL Example:
addrmap gdl_acc_regfile #(
longint unsigned NUM = 3,
longint unsigned ADDR_WIDTH = 16
) {
regfile acc_region #(
longint unsigned ADDR_WIDTH_LIMIT = 48
) {
reg {
regwidth = 32;
field {
sw = rw;
hw = r;
desc = "Start address of the region.";
fieldwidth = NUM;
} addr ;
} cfg_region_start;
};acc_region acc_region;
};
Command Line: idsbatch -out “verilogl” -bus apb -top_property “define_as_param=true;” test.rdl -dir ids
Output:module gdlaccregfile_ids#(
// PARAMETERS
parameter NUM = 3,
parameter ADDR_WIDTH = 16,
parameter ADDR_WIDTH_LIMIT = 48,
localparam bus_width = 32,
localparam addr_width = 2,
localparam block_size = 'h4,
localparam [addr_width-1 : 0] block_offset = {(addr_width){1'b0}}
. . . . .
. . . . .
. . . . .
//----------------------------------------------------------------------------
// FIELD : ADDR
// HW ACCESS : RO WIDTH : 1
// SW ACCESS : RW OFFSET : 3
//-----------------------------------------------------------------
/*DESCRIPTION : Start address of the region.
*/
always @(posedge clk) begin
if (!reset_l)
begin
accregion_cfgregionstart_addr_q <= 1'bx;
end
else
begin
if (accregion_cfgregionstart_wr_valid) //ADDR : SW Write
begin
accregion_cfgregionstart_addr_q <= (wr_data [NUM : NUM] & reg_enb [NUM : NUM] ) | (accregion_cfgregionstart_addr_q & (~reg_enb [NUM : NUM] ));
end
end
end //end always
assign accregion_cfgregionstart_addr_r = accregion_cfgregionstart_addr_q; // Field : ADDR
assign accregion_cfgregionstart_rd_data = accregion_cfgregionstart_rd_valid ? } : 32'd0;
. . . . .
. . . . .
. . . . .
Conclusion:
IDesignSpec new parametric RTL generation tools bring more flexibility and efficiency to design, making it easier for users to customize RTL designs and integrate them seamlessly with System RDL standards. It’s a game-changer for RTL design, offering better control and adaptability for optimized performance.